Showing posts with label Stampin'up. Show all posts

Saturday, June 20, 2015

Dad's Day

Hello again!

  So tomorrow is Father's Day and I wanted to show you the two cards I made for my Hubby and my Son-in-Law. I really didn't spend alot of time on them, but the creative juices did flow a bit.

  This first one is for my Hubby, and I did an homemade action wobble for the mustache.


This next one is for my Son-in-Law, and I got the idea from two different cards I saw on Pinterest .


Thanks for peeking!

Wednesday, March 18, 2015

Party Animal

Hey Ya'll!

   I wanted to show you this card I made for my Grandson for his 18th birthday. When this stamp came out I just couldn't wait to purchase it and use it on a card!

   I used my Shinhan alcohol markers on it and I think it turned out pretty good for my amateur status. I'm more of a water color pencil girl, but I'm getting to where I like the Shinhan's a little better each time I use them! Any way, after I got the stink eye, my Grandson said he liked it and that's all that really matters.

   I hope everyone enjoyed their St. Pat's day, and thanks so much for looking in on me.


Tuesday, December 23, 2014

Very Merry

Hello everyone!
     Just a quick share with one last Christmas card. I am baking and making candy today for tomorrow night. I can't believe that the year is almost gone! It seems to go by faster each year.
    This card was made with the Snowflake Thinlits die from S.U. I did go back and add some small snowflakes all over the card because I thought it looked too plain, and I love how it turned out!
     I want to wish all of you a Very Merry Christmas and a Happy New Year! I will be back after New Year's, and start on "Birthday Season" which is fast approaching! 
     Thanks for peaking!


Friday, December 19, 2014

Counting down!

Hello everyone!
  I wanted to show you another quick card made from a kit from Stampin' Up.Just like the previous post, this comes with everything you need to make about 20 cards. The tree cutouts, flag, cards and envelopes and embossed matting were all part of the kit. I added the ribbon, the bling and the washi tape. 
  Cards are mailed, presents are wrapped and now the count down begins! On to baking and candy making! Still wishing for a white Christmas, but I don't see it happening here. Thanks for visiting me!


Sunday, November 30, 2014

Stardust

Hello everyone!
   I thought I would pop in and show you a card I made for a Baby Shower earlier this month. I fell in Love with this sentiment when I first saw it and couldn't wait to use it! I got the idea for the card and the cute little boy from Pinterest "Punch Art by Stampin Up." Their baby was hanging from a tree branch, but I thought hanging him from the moon fit better with the paper I used. You can't really tell from the picture, but the front sentiment is glittered up as well as the tiny silver dots around the star cutouts.
  I've started on my Christmas cards, and I'll have some to show you soon. I hope everyone had a wonderful Thanksgiving and didn't gain too many extra pounds! I swear , I gained weight just looking at all the food and goodies, he he ! Thanks for looking in on me. See you soon!


Monday, October 27, 2014

Halloween Baby

Hey Ya'll!
  This is my annual post for my Hubby's birthday card. This  year"s card is all about his Halloween Birthday. Last year I made him a plain ol' birthday card so I thought I would play this year. I made the spider from felt and pipe cleaners and gave him some droopy/sleepy eyes. Since hubby is "60 something" I added an action wobble so he will shimmy shake when he takes it out of the envelope. I hope you enjoy and wish every one a safe and happy Halloween!


:
Supplies- Stampin' Up: Sentiment stamp "Age Awareness", Liquid Pearls for the teeth, Memory Box: "Spider Web" die, Recollections: for the eyes , Inspiration for the spider found on Pinterest, Small spider from my stash.


Tuesday, September 30, 2014

A Little Halloween

Hello everyone!
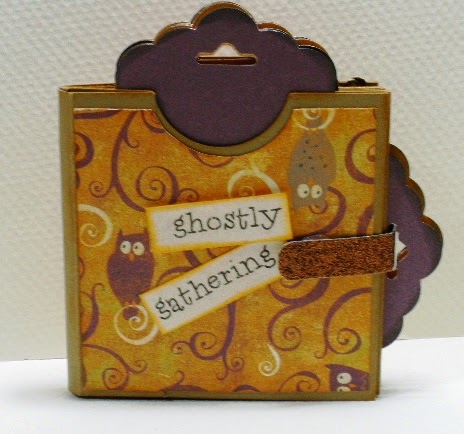
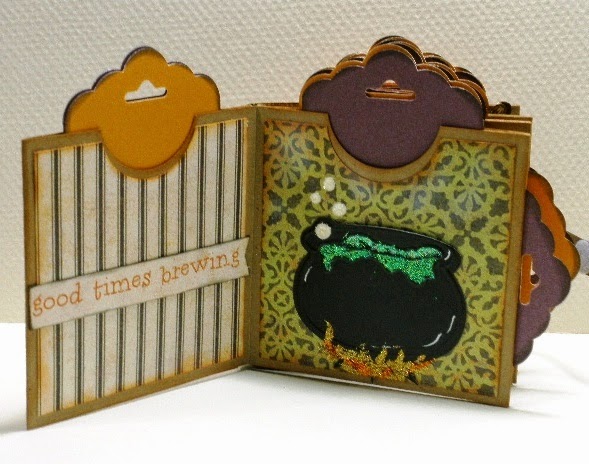
  I'm really getting back into making mini's lately and came up with this one at a crop/team meeting a couple of weeks ago. You know how I like them...the smaller the better? This is called a One Sheet Wonder, meaning it was made with one sheet of 12x12 paper. Well, actually 3 sheets of 12x12 because I kept gluing it wrong and ended up making 3 books before all was said and done, hehe! I  got the idea from http://getcreativewithtraci.co.uk/ on Pinterest. I did finally make the book, and finished it up at home. This one is for Halloween. I used CTMH papers and some punches and dies from my stash. Thanks for looking! 


Supplies- CTMH: " Moonlight" WOTG( retired), 11/4 inch circle punch and Bronze and Black Shimmer Trim,  S.U.: "Tag Topper" Punch, One 12x12 sheet of Kraft Cardstock from my stash, Martha Stewart: "spider Web" border punch, "graveyard Mice" Border punch and the "Bat" Punch, Sizzix die: Large Bat, Glitter glue and paper from my stash. 

Thursday, July 31, 2014

Mini Album Project

Hello everyone!
  I am finally done with the project I was telling you about, and it is a baby mini album for my daughter! She had the baby last Friday by emergency c-section, and we are so glad that he is finally here! I finished the album the night before he was born. Talk about cutting it close! I was working it "down to the wire"! Anyway I can finally show you a few of the pages. It is supposed to be a "book of first's". You know, first smile ,first bath, first haircut, etc.. I love how it turned out and I hope you do too!


Supplies- CTMH: "Babycakes" paper and WOTG,  My Creations "Kraft Pocket Album", Inks- Lagoon,Sunset, Chocolate, and Creme Brulee, Stamps- "Special Care" and "Wild Wonders, Bronze and Teal "Shimmer Trim", Cricut Cartridges- "Artbooking" and "Art Philosophy".
Me and My Big Ideas- camera stickers. Recollections- Pinwheel Stickers. Paper Studio- Mini Craft Stacks. Special Moments- Bears. Crate Paper- "Cowboy Collection Punch outs. S.U.- Stamps "Banner Blast "and Bundled Baby" and the "Banner Punch". Provo Craft- Cartridges "Everyday Pop-Up Cards", " Simply Charmed", and "B is for Boy". 

Saturday, July 19, 2014

One Page Mini

 Hey Ya'll!
 It seems like forever since I posted, but here is one of the projects I've been working on! I've  made one of these before, and I really love how quickly they come together. It's made from an 8 1/2 x 11 sheet of paper. The technical name for it is an X Book.The finished size is 2 3/4 x 2 3/4. It's really just a small cute little tag album. I hope everyone is keeping busy and staying crafty in this hot weather. School will be starting back here soon, and the Summer is slipping away. Thanks for peeking in on me, I enjoy hearing from all of you!
(Warning: Picture heavy)


Supplies-  Tim Holtz: Tissue wrap stained with distress ink, Ideology "Word Bands", "Paper Clips, and "Pins" Stamps: CTMH Petite Perks "Delicate Wings" and "Scrapbook Statements- Poets" Dylusions "Clearly the Right Words", Sentiment stickers: Cosmo Cricket "Tiny Text", Splash of Color: "Mixed Media 101", S.U.: "Scallop Tag Topper"  punch, Brass word plate from my stash, Feathers:  Made by yours truly. 

Tuesday, July 1, 2014

Quilted

Hello everyone!. 
   Just a quick share today to show you this cute card made with scraps from my stash. I'm forever saving pieces of paper that most would throw away, and decided it was time to do something with them. I first used all my long strips of scrap to weave a mat for my card. Then I ran it through the Big Kick with an embossing folder before attaching it to the card. I stamped the sweet little rag doll and the sentiments inside and out with a CTMH stamp, made a jute bow and called it done! I hope everyone is enjoying this beautiful Summer weather?!  I'll be back soon to show a project I've been working on, and thanks for peeking in on me. I love reading your comments, it just brightens my day!


 Supplies: CTMH- Doll and sentiment "Stiches With Love", S.U.- Embossing folder "Square Lattice", Paper Studio- Scallop circle punch 1.5 inches.

Monday, June 9, 2014

Flowers

Hey Ya'll!
   Just a quick post today to show you this Flower Pot Card I made recently. It had been so long since I made one of these, I forgot how much fun they were to make! I used one of my favorite Cricut carts and some flower punches for the flowers, embossed the flower pot and tied it with some ribbon from my stash. Have you made one of these lately? Hope you enjoy the peek, and thanks for checking in on me!

Supplies- Close to My Heart: Inside sentiment from "Thoughtful Tidings" , Cuttlebug: Embossing folder "Distressed Stripe", Stampin' Up: Small flowers- "Petite Petals" bundle, Large flowers- "Triple Treat" stamp and "5 Petal Flower" punch, Front sentiment- "A Round Array" with 7/8" scallop punch, Sunflowers- Cricut cartridge "Walk in My Garden".
 

Friday, May 9, 2014

Mother's Day

Hey Ya'll!
  It's that time again, the rush to get Mother's Day projects done before the actual day ! I've been busy making the cards, shopping for presents and even making a box for one of them to go in. I have been seeing these pop-up card boxes everywhere I look lately, even at Walmart of all places! When I saw how much they wanted for one, it sealed the deal, and I had to make one for myself.
  Oh course it ended up not being for me but for my Mother. I got the instructions and a tutorial at Split Coast Stampers, and it really was not as hard as it looks. The box itself took no time at all. It was deciding what to put in the box and where to put it that took so long, lol. I did some stamping and embossing on the flowers, and used a strip of acetate to place the butterflies on. I also made a belly band( not pictured ) to hold the card closed.

I had so much fun making this one, that I made another one for my Grandson to give to his Mother!
This one also has a belly band (not shown). I wish all of you a very Happy Mother's Day, and thanks for peeking!


Supplies- Top box: S.U.- Designer Series paper "Everyday Enchantment" (retired), Large flowers- "Secret Garden" bundle, Small flowers- "Petite Petals" bundle, Martha Stewart: Rose Leaf", "Frond", and "3 in 1  Butterfly" punches, Sentiment: Studio G.
   Supplies- Bottom box: CTMH- Paper "Pemberly" (retired), Large flowers: " Art Philosophy", Sen-
timent: "Splendid Day" (also retired), Martha Stewart: "3 in 1 Butterfly" and "Frond" punches. S.U.: "Petite Petals" bundle.

Thursday, April 17, 2014

Easter wishes

Hey everyone!

   Isn't it funny how you run across something you forgot you had while looking for something else, and know instantly why you bought it ( 3 years ago ) and what you intended on doing with it! Such was case with these little bunnies that I purchased at Big Lots when they use to carry a good selection of scrapbook supplies. Sadly this is not the case any more, at least not at the one in my town. Any way,  I rescued them from going into the yard sale bag and teamed them up with an embossing folder I recently purchased from Consumer Crafts online. A couple of weeks ago they had all of their embossing folders on sale for $1.99 and I bought 6 or 7 of them at that price! It all came together rather quickly once I dug through the gazillion buttons that I have in my stash! Honestly, I think the buttons are growing like weeds in my craft room. I find them everywhere!!


  I hope you all have a wonderful Easter, and thanks for peeking in on me!

    Supplies- Bunnies: Paperbilities, Martha Stewart: Grass border punch and "Frond" punch for the leaves, "Loops"  punch around the page for the inside, Darice: "Cloudy Sky" embossing folder, Stampin' Up: "Banner" punch and "Loads of Love" stamp set for the sentiment, Button flowers from my ever growing collection.

Sunday, April 13, 2014

Easter Chick

Hello everyone! I dropped in today to show you another little Easter card. I have been seeing these shaker cards all over Pinterest and on various blogs and I thought I would try one myself. I ( Don't faint ) got out my Cricut and and cut out the window using the centerpoint feature. I stamped the egg, cut the top half off, then I used the top half as a mask so that I could add the chick from another stamp, then stamped it again and added the chick. I then used my markers and colored pencils to  color in the egg and chick. I fussy cut them out and glued them to another piece of patterned paper. To make it a shaker, I used  a small bag that "dollar stamps" come in and added the sequins. I used Score tape to adhere the whole thing to the back of the mat and glued it all down to the card base. I had so much fun with this that I ended up making two of them. I hope you'll try this yourself, it was really not as hard as it sounds. Thanks for looking!


    Supplies- CTMH: Cricut Art Philosphy", "Colored Egg" M stamp. S.U.:" Modern Label" punch, EK Success: Scallop Circle punch, Both ribbons and sentiments from my stash, Sequins from Hobby Lobby in the Easter section. 

Sunday, April 6, 2014

Dry Embossing.

Hello all!

  I was recently asked to do a technique for one of our Team Training Days with Close to My Heart. This is what I came up with. I used the Easter egg from one of the new "M" stamps and did some dry embossing with a stylus. In keeping with the "purge" of 2014, I used some retired papers from CTMH also. This was the second try on the egg. The first one was done on colored vellum and I didn't get as good of an impression I as wanted, so this one was done with plain white vellum. I used watercolor pencils and a blending pen for the egg colors. Even though Easter is a bit away, it will be here before you know it! Are you getting your cards and decoration made and ready to send out snail mail? I hope so. Thanks for looking in on me!


Supplies- CTMH: Paper "Lucy", Egg: M Stamp "Colored Egg", Bling: "Bitty Sparkles" and "Glitter Gems". SU: Punch "Modern Label". Sentiment: Studio G. Ribbon from my stash.

Wednesday, March 19, 2014

Happy Spring!

Hey Ya'll!
   Just thought I would pop in to wish everyone a Happy Spring and to show you the wreath I made for my Daughter to go on her door.I recently made a wreath from a kit I purchased from Stampin' Up, and my daughter liked it so much she wanted me to make her one.She purchased a wreath form from Michaels and I used papers and ribbon from my stash(which I'm still purging, I keep finding stuff I forgot I had!) and this is what I came up with!


     I used fringe scissors for the "fluffy" flowers cut out some circles to form the large flowers and cut out a few leaves and some large spikey bases for another flower. Then I punched out some spikey small flowers for the centers. All in all it turned out better than I thought it would. Here's a picture of the S.U. wreath I used for inspiration. I used feathers instead of leaves.


Supplies- S.U.: Burlap and Blooms Simply Created Wreath Kit as the inspiration piece,  Stamped feathers: CTMH "Feathers" Seasons and Nature.
My wreath- CTMH: Burlap ribbon, Large Spikey flower: Cricut cart "Mother's Day Bouquet", Fringe Flowers: Martha Stewart fringe scissors, Leaves: Sizzix Thinlet "Branch w/ Leaves #3" Flower centers: Fiskars punch, Buttons from my stash.

Wednesday, March 12, 2014

Feel Better

Hello everyone!
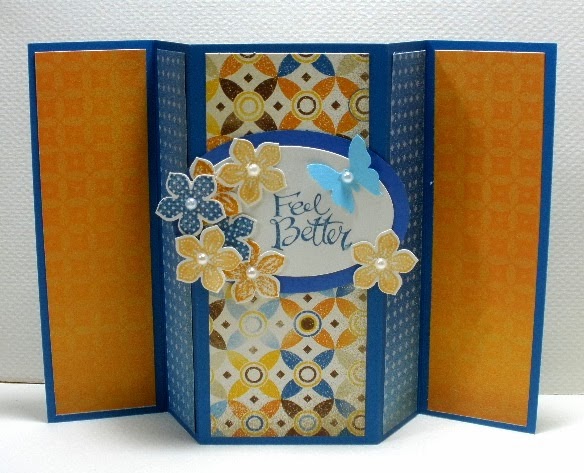
  My goodness, I didn't realize I had been away so long! I have been under the weather a bit, but still trying to keep busy. I got the idea for this card from a Stampin' Up demonstrator. It's quick and easy, and is basically a reverse gate fold card. The back middle panel has been matted and stamped with a sentiment. I used some retired paper from Close To My Heart and a new stamp and punch bundle from S.U. When I made this card, my annual "change of the season lots of pollen in the air allergies" had kicked in and I suppose I was trying to make myself feel better. I guess it worked! I have been busy purging and organizing (spring cleaning) and card making....... I hope at least some of you are experiencing this wonderful spring weather. Thanks for dropping by!
 Supplies-  CTMH: Retired paper "Dreamin'", S.U.: Flowers "Petite Petals" bundle, Sentiment "Sassy Salutations", Labels "Oval" Framelits. 

Wednesday, February 12, 2014

Love


Hello everyone!
  I am so happy that my blog has finally been restored, and she even changed the title around a little! I really didn't like the plain Jane look and even though this is the same background, it's been so long, that everything looks bright and new to me.
  For my card today I really just used the paper as my inspiration and went from there. I stamped a couple of doilies( can you tell I:m into doilies lately), did some cutting and punching, added some embellishments, and there you have it! Another quick and easy valentine! I'm so glad you stopped by to take a look. Please keep warm and dry and safe in this crazy weather!

Supplies- Paper: MME "Love Me" 6x6 pad, Stamped doilies: SU "Delicate Doilies", Punched doily: SU "Triple Doily" punch on metal,Top border: Sizzix Edgeabilities "Classic Ric Rac",Sentiment: Paper Studio everyday stamp "Artwork" wet embossed, Birds: Colorbok "Flea Market".

Tuesday, February 11, 2014

Be Mine


Hey everyone!
 I have been so busy making birthday cards that Valentines Day is sneaking up fast! I thought I would show you this quick and simple card. I started with a pre-made card base and stamped a sentiment onto a piece of white card, then played with my watercolor pencils. I popped it up on top of a doily that I purchased from the dollar bins at Target and finished with a ribbon and a button. Easy peasy!
 Today was the second birthday this week, and I have three more to go this month! Whew! I always fill so rushed this time of the year. I hope everyone has planned their card making schedule a little better than I have, and won't be in such a rush to finish your valentines this week! I'll be back tomorrow with another one for you..... Thanks for peeking!

Saturday, January 11, 2014

Birthday

Hello everyone! I hope everyone had a wonderful Christmas and New years! Things are starting to quite down a bit here on the home front. My Dad got home from his re-hab the Friday before Christmas and ended up going to the emergency room on Saturday because of some heart problems, so we spent Christmas in the hospital again this year! He is now in another re-hab with a week to go ,but has developed a bacterial infection. Needless to say, he is not a happy camper! On top of all that, my Hubby had rotator cuff surgery done this past Thursday, and "I gotta' do everything" like   he always tells me he does! With that being said, I haven't had a lot of spare time to spend in my craft room. This is "Birthday Season" at my house though, so I am trying to at least get those cards made. This one is for my Mom's whose birthday  next month. This one is made with core'dinations paper which I embossed with a Quik Kutz folder. I added a sentiment, some flowers from my stash that I blinged up, and a knotted seam binding ribbon to finish it off. I hope you enjoy, and thanks for peeking!
Supplies- Quik Kutz: "Swirls" embossing folder, Stampin' Up: Sentiment "Perfect Punches", Label "Designer 
Frames" embossing folder, Lg. Oval punch,Tim Holtz:Decorative strip"Vintage Lace.